19. 10. 2022
9 min read
Augmented Reality - MediaPipe - Google's AR Library
In the first part of the blog dedicated to augmented reality, we talked about Snap lens and Spark AR platforms. In this second part, we will cover the MediaPipe library, which in comparison to the two above requires some programming skills. We have also prepared a simple example, which you can follow and code along!
Martin Naščák
Software Engineer


You can find the first part of the article here.


MediaPipe is an ML framework that enables us to run models in a pipeline and also offers some pre-trained models like hands or face estimation. The media pipe hand model was evaluated as the underlying technology for hand modeling in our AR application.
The metric 3D world can be understood from animation showing face mesh approximation. The model can estimate the position of the camera, and thus output the coordinates relative to the camera. This makes it easy to render the mesh in a rendering engine so that the mesh fits the camera input.
Compared to other hand tracking models, MediaPipe's hand tracking mode is the most precise one.
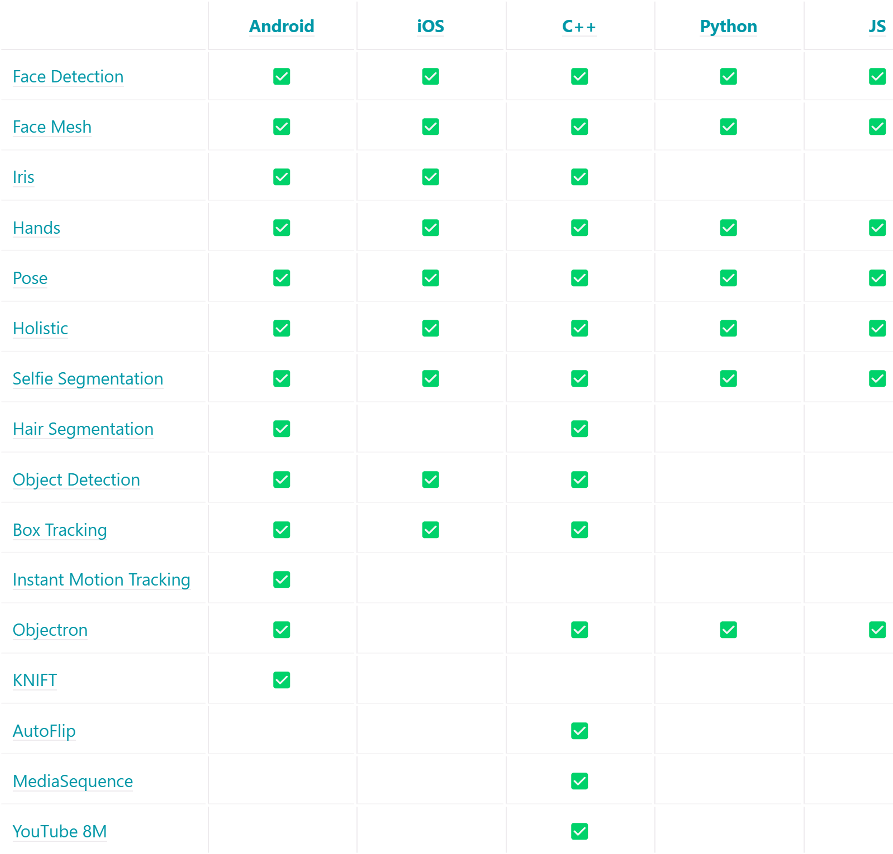
It has support for various platforms and it also has a JavaScript library!

What MediaPipe is not?
Unlike other platforms we discussed before, MediaPipe is not an end-to-end solution for AR. There is no rendering of a virtual world, and it only works with video input. The MediaPipe output is the only outcome of tracking the video input.
How to solve the missing rendering
We will use BabylonJS - a WebGL-based technology to render our models in the virtual world and then place them onto the camera screen to solve the first problem. Consequently, now we have two layers that we are dealing with Camera context and WebGL context, and we'll have to sync Mediapipe's output values with WebGL's 3D World.
Output in JavaScript implementation
This is what the output from MediaPipe looks like:

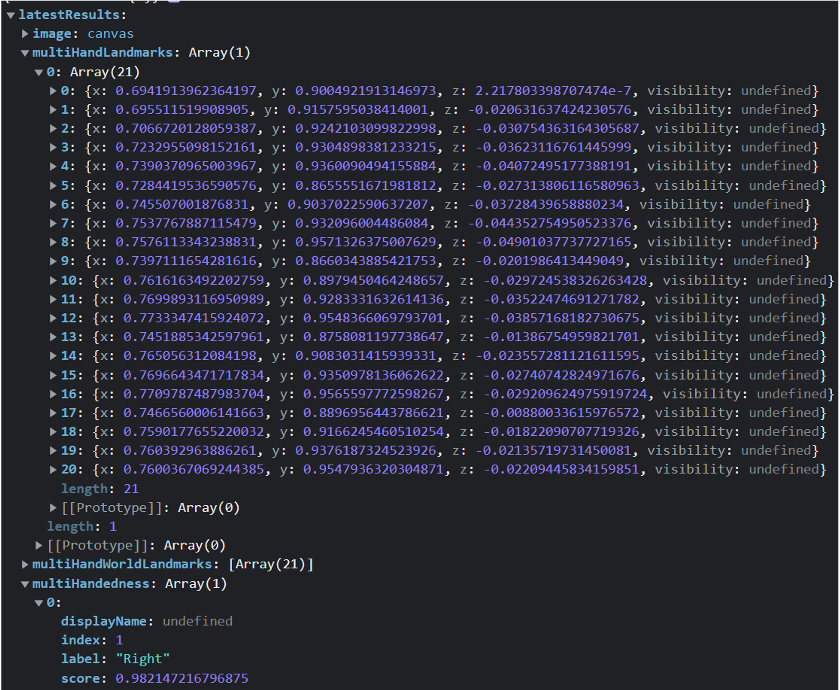
As you can see, MediaPipe returns an array of points per hand. Coordinates have 2 different forms: World landmarks and Relative landmarks.
World landmarks
Represent the world position of the tracked hand. Output has 3 coordinates
[x, y, z].Coordinates are in meters.
zcoordinate is in unknown units. It is not properly documented in MediaPipe docs.
Relative landmarks
These return normalized coordinates relative to your camera screen.
Using relative landmarks we can estimate the position of the hand on the screen.
Problems we encountered with MediaPipe
The first problem we ran into was the syncing problem. As we mentioned before, since we already picked BabylonJS for rendering, we now had 2 layers of outputs - from the camera and from our 3D World in BabylonJS. Syncing these layers is our first challenge. We must convert MediaPipe output into BabylonJS world so it fits in the camera output. Fortunately, we found a solution for this with the Unprojection function in BabylonJS - this allows us to correctly place the 3D models.
const vector = Vector3.Unproject( new Vector3(landmark.x, landmark.y, 1), // [x, y, z] screenWidth, screenHeight, Matrix.Identity(), viewport.getViewMatrix(), viewport.getProjectionMatrix());The second problem we encountered is 2.5D instead of true 3D. Given the depth of the hand pose estimation not being precise, the final output has some degree of imprecision and can be considered 2.5D instead of 3D. Unfortunately, we could not resolve this issue in our project, because the documentation on how to calculate the depth of the objects based on MediaPipe output is missing.
The problem is, that the z coordinate is not present in the unprojection input, and because of that, we are unable to ‘denormalize’ it, given the docs are not clear on how to use it.
Limitations
The aforementioned
zcoordinate is not properly documented. You can check out the issue about understanding z coordinate]MediaPipe can only track up to 4 hands
Very high precision for 3D Hand tracking has its costs and it has poor performance. It requires devices with very powerful CPUs
Babylon.js
Babylon.js is a real-time 3D engine using a JavaScript library for displaying 3D graphics in a web browser.
It is an abstraction over JavaScript's WebGL and we will use it to build our own 3D World for displaying our objects.
We will not talk about Babylon.js in depth. There is so much to say about it that we could dedicate an entire blog post to it.
Summary
The Mediapipe framework and its trained Hand Tracking model appear to be the most suitable and cutting-edge AR technology for our use case. However, even though it claims to estimate hand depth, we haven’t been able to use it in our 3D world projection.
The framework has face mesh detection with AR camera position estimation (true 3D metric world coordinates) which could potentially extend to the hand pose model, which would resolve our problems with the z coordinate.
We are keeping an eye on the unresolved problems and the latest updates from the MediaPipe authors.


Okay, now it's time to build something!
Let's build a simple AR application using MediaPipe and BabylonJS to demonstrate how AR works and how to use it with MediaPipe in Typescript.
The web application we will build is going to use the camera to locate hands in the viewport and display dots at the coordinates we receive from our MediaPipe API and transform it into a BabylonJS scene.
You can find the full example in this github repository.
Installation
Let's assume that we have a ready-to-use express server. At the very beginning, we must install MediaPipe and Babylon.js
We will use their simple esbuild script to pack our code. You can replace it with WebPack or anything else.
Let's install our dependencies.
npm
npm init
npm install typescript esbuildnpm install @mediapipe/camera_utils @mediapipe/handsnpm install babylonjs @babylonjs/core @babylonjs/loaders
yarn
yarn add typescript esbuildnpm add @mediapipe/camera_utils @mediapipe/handsnpm add babylonjs @babylonjs/core @babylonjs/loadersAdd typescript config
tsc --initSetup build script in package.json
"scripts": {+ "build": "esbuild ./src/index.ts --bundle --outfile=./public/main.js" },Let's start with our index.html which is very simple:
<!DOCTYPE html><html lang="en"><head> <meta charset="UTF-8"> <meta http-equiv="X-UA-Compatible" content="IE=edge"> <meta name="viewport" content="width=device-width, initial-scale=1.0"> <title>BabylonJS first application</title></head><body> <video id="video"></video> <canvas id="canvas"></canvas></body></html>Do not forget to embed our JavaScript output. We are still missing our 2 layers: video and WebGL context.
WebGL Context is using the canvas element, so let's add it in.
The canvas and video must be in the same place so that they overlap. We will achieve that with a simple CSS absolute position.
<!DOCTYPE html><html lang="en"><head> <meta charset="UTF-8"> <meta http-equiv="X-UA-Compatible" content="IE=edge"> <meta name="viewport" content="width=device-width, initial-scale=1.0"> <title>BabylonJS first application</title>++ <script type="module" src="/main.js"> </script>++ <style>+ body { margin: 0; outline: 0; height: 100vh; overflow: hidden;}+ canvas { position: absolute; width: 100%; }+ video { position: absolute; width: 100%; }+ </style></head><body>+ <video id="video"></video>+ <canvas id="canvas"></canvas></body></html>Now that we have our base HTML ready, let's add in our TypeScript code.
The first file will be ./src/scene.ts and it will create just a simple Babylon.js Scene.
We will create a simple scene with FreeCamera and Hemispherical light.
Note the scene.clearColor - it is used to define the background color of our world, where the 4th argument is alpha. Setting alpha to 0 means that the background will be transparent. This is required if we want to display a video with a 3D world on top of it.
import {     Scene,     Engine,     HemisphericLight,     Vector3,     FreeCamera,     Color4} from "@babylonjs/core";
/** * Create a basic babylonJS Scene on the canvas element */export const initializeScene = (canvas: HTMLCanvasElement) => {    const engine = new Engine(canvas, true);    const scene = new Scene(engine);
    scene.clearColor = new Color4(0, 0, 0, 0);
    //scene.debugLayer.show(); - Display babylonJS DebugLayer
    new FreeCamera("Camera", new Vector3(0, 0, 0), scene);    new HemisphericLight("light1", new Vector3(1, 1, 0), scene);
    /** Here we put the code for the rendering loop **/    engine.runRenderLoop(() => {        scene.render();    });
    return scene;}
Next up, we create the src/spheres.ts file.
Spheres will create and return our spheres in BabylonJS - you can simply edit this or add your own models. The output is an array of 2 arrays that contain 21 different spheres.
Take a note that this code is not optimized and is used only for testing. In production, you could create instances if you share the same geometry for multiple meshes. Instances do not call new draw calls and improve performance.
import { Mesh, MeshBuilder, Scene } from "@babylonjs/core";
/** * Build a simple TUPLE with 2 arrays of 21 Spheres that we will place on each point later * **/const buildSpheres = (scene: Scene, landMarkPoints: number) => {    // Create our array of spheres    const spheresLeft: Mesh[] = [];    const spheresRight: Mesh[] = [];
    for (let i = 0; i < landMarkPoints; i++) {        // We should use instances to hit better performance        spheresLeft.push(MeshBuilder.CreateSphere("Sphere"_ + i, { diameter: 2 }, scene));        spheresRight.push(MeshBuilder.CreateSphere("Sphere_" + i, { diameter: 2 }, scene));    }
    return [spheresLeft, spheresRight];}
export default buildSpheres;
Let's continue with the main entry point src/index.ts:
In this file, we initialize our scene and MediaPipe Hand model.
The camera is used to render the camera view in the video element.
Handsis our ML Trained Hand tracking model that calls the.onResultcallback every frame.Notice the line where we set our camera
zcoordinate to -100.
import { FreeCamera } from "@babylonjs/core";import { Hands } from "@mediapipe/hands";import { Camera } from "@mediapipe/camera_utils"import "@babylonjs/loaders/glTF";import "@babylonjs/inspector";
import { initializeScene } from "./scene";import buildSpheres from "./spheres"import render from "./render";
const initialize = async () => {    const canvas = document.querySelector("#canvas") as HTMLCanvasElement;    const video = document.querySelector("#video") as HTMLVideoElement;    if (!video || !canvas)        return;
    // Setup our scene    const scene = initializeScene(canvas);    // Store our camera's reference    const viewport = scene.activeCamera as FreeCamera;    viewport.position.z =  -100; // Remember this line!
    const landMarkPoints = 21;    const [spheresLeft, spheresRight] = buildSpheres(scene, landMarkPoints);
    /** Locate Hand tracking ML Trained model */    const hands = new Hands({        locateFile: (file) => `https://cdn.jsdelivr.net/npm/@mediapipe/hands/${file}`    });
    /** Settings for our MediaPipe hand tracking model */    hands.setOptions({        selfieMode: true,        maxNumHands: 2,        modelComplexity: 1,        minDetectionConfidence: 0.5,        minTrackingConfidence: 0.5    });
    /** This is our AR Camera that will render camera on <video> element */    let camera = new Camera(video, {        onFrame: async () =>  await hands.send({ image: video }),        width: window.innerWidth,        height: window.innerHeight,        facingMode: "environment"    });
    camera.start();    hands.onResults((result) => render({        canvas,         video,         result,         spheresLeft,         spheresRight,         landMarkPoints,         viewport    }));}
window.onload = initialize;
And finally the most important part - the render function in src/render.ts. This function is called inside hand.onResult() callback.
import { Camera, Matrix, Mesh, Vector3 } from "@babylonjs/core";import { Results } from "@mediapipe/hands";
interface RenderInputs {    canvas: HTMLCanvasElement    video: HTMLVideoElement    result: Results    viewport: Camera    spheresLeft: Mesh[]    spheresRight: Mesh[]    landMarkPoints: number}
/** * Render function is called at the highest possible speed after MediaPipe hand-tracking model finishes its calculation. */const render = ({    canvas,     video,     result,     spheresLeft,     spheresRight,     landMarkPoints,     viewport}: RenderInputs): void => {    canvas.width = video.videoWidth;    canvas.height = video.videoHeight;
    for (let i = 0; i < landMarkPoints; i++) {        spheresLeft[i].isVisible = false;        spheresRight[i].isVisible = false;    }
    if (!result || !result.multiHandLandmarks.length) {        return;    }
    for (let hand = 0; hand < result.multiHandLandmarks.length; hand++) {        // const wristFactor = result.multiHandLandmarks[hand][0].z;
        for (let i = 0; i < landMarkPoints; i++) {            const coords = {                x: video.videoWidth - result.multiHandLandmarks[hand][i].x * video.videoWidth,                y: result.multiHandLandmarks[hand][i].y * video.videoHeight,                // z: result.multiHandLandmarks[hand][i].z * wristFactor            }
            const vector = Vector3.Unproject(                new Vector3(coords.x, coords.y, 1),                video.videoWidth,                video.videoHeight,                Matrix.Identity(),                viewport.getViewMatrix(),                viewport.getProjectionMatrix());
            if (result.multiHandedness[hand].label == "Right") {                spheresRight[i].isVisible = true;                spheresRight[i].position.x = vector.x / 100;                spheresRight[i].position.y = vector.y / 100;            } else {                // We substract from projection camera height                spheresLeft[i].isVisible = true;                spheresLeft[i].position.x = vector.x / 100;                spheresLeft[i].position.y = vector.y / 100;                //spheresLeft[i].position.z = vector.z;            }        }    }}
export default render
At the beginning of our loop, we set all our spheres as invisible, so if there is no hand on the screen, spheres will not be visible.
for (let i = 0; i < landMarkPoints; i++) { spheresLeft[i].isVisible = false; spheresRight[i].isVisible = false; }The first loop returns an array of all hands that MediaPipe recognized.
for (let hand = 0; hand < result.multiHandLandmarks.length; hand++) {The second loop will iterate over each individual point on the hand. We are also creating a new coords object here, where we de-normalize MediaPipe coordinates by simply multiplying them by video width/height. As you can see in the code below, we could not find the right formula to denormalize the z coordinate.
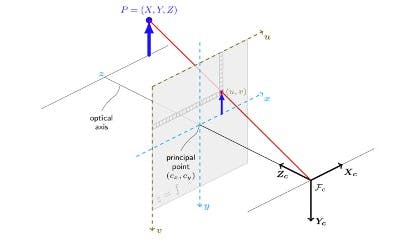
for (let i = 0; i < landMarkPoints; i++) { const coords = { x: video.videoWidth - result.multiHandLandmarks[hand][i].x * video.videoWidth, y: result.multiHandLandmarks[hand][i].y * video.videoHeight, // z: result.multiHandLandmarks[hand][i].z * wristFactor }Here is our magical transformation to 3D World: Unprojection. In reality, the 3D world on a computer screen is a myth - it does not exist on your screen because your screen can only display 2D images. So, how does it work? All rendering engines are using 3D worlds to estimate where the objects are and how far they are from the viewport and then apply shaders and all post-processing calculations. But at the very end of these processes, there is a Project function (or transformation) that converts a 3D World to a 2D Rasterized image from a viewport. These images are also called frames. If we run this whole process multiple times per second, we will experience the real 3D world on our computer screen. In our case, we must go backwards - we have normalized screen coordinates and we must unproject them back to the 3D world. This is why Unprojection was used.

const vector = Vector3.Unproject( new Vector3(coords.x, coords.y, 1), video.videoWidth, video.videoHeight, Matrix.Identity(), viewport.getViewMatrix(), viewport.getProjectionMatrix());Now our vector contains 3D coordinates that match the 3D World so we can apply them to the spheres.
if (result.multiHandedness[hand].label == "Right") { spheresRight[i].isVisible = true; spheresRight[i].position.x = vector.x / 100; spheresRight[i].position.y = vector.y / 100; } else { // We subtract the camera height from the projection spheresLeft[i].isVisible = true; spheresLeft[i].position.x = vector.x / 100; spheresLeft[i].position.y = vector.y / 100; //spheresLeft[i].position.z = vector.z; }Okay, so far everything works! But what is this / 100? Do you remember when we told you to note that viewport.position.z line? If not, check it again.
We set our camera to be 100 units far from the object in our hand. To get the exact X and Y coordinates, we must divide our vectors by the distance of our camera.
And that is it! This is a very simple AR example with MediaPipe and Babylon.js. You have your spheres placed at each point of your hand and you can replace them with your models.
Conclusion
Target tracking is an excellent and precise model that corresponds with our client's demands, but the fact that physical markers are required to mark nails is an unacceptable business requirement.
The hand-tracking model is a new model that is not precise enough yet. It turns out that the MediaPipe hand-tracking model is more precise when compared to Snap Lens or others. The hand-tracking model has issues with tracking objects in motion. This model was improved a lot in the last 2 years, and we can expect it to be more and more precise in the future.
Summary
In this blog post, we continued our discussion about Augmented Reality and the Hand Tracking model we used in the example. There are a lot of other models, for example: Face tracking, Gestures, Pose, Hair Segmentation, and much more that can be used for AR applications supported by MediaPipe.
We highly recommend using MediaPipe models for your projects. MediaPipe models can be applied directly to your project without any other libraries and they are very precise. For JavaScript implementation, performance can be an issue and you will probably need a stronger device to run complex models.
MediaPipe is the best solution that also has a JavaScript library and works in a browser.